Swagger and ASP.NET Web API - Part II: Enabling OAuth 2.0
This is part two of a series on using Swagger with ASP.NET Web API. If you haven’t already, I encourage you to read Part I before continuing.
This post will focus on enabling OAuth 2.0 support to describe authentication/authorization in Swagger JSON. The identity provider used in the demo is Identity Server 3, a .NET implementation of OpenID Connect (a simple layer on top of the OAuth 2.0 protocol), but any implementation of OAuth 2.0 should work. We will continue to use the ASP.NET Web API project from Part I as well as Swashbuckle to configure Swagger.
All source code for this series can be found here.
As a reminder, here is the Swashbuckle configuration where we left off in Part I.
GlobalConfiguration.Configuration
  .EnableSwagger(c =>
  {
    c.SingleApiVersion("v1", "SwaggerDemoApi");
    c.IncludeXmlComments(string.Format(@"{0}\bin\SwaggerDemoApi.XML",
                         System.AppDomain.CurrentDomain.BaseDirectory));
    c.DescribeAllEnumsAsStrings();
  })
  .EnableSwaggerUi();
The first thing we will want to do is include the OAuth 2.0 definitions in our Swagger JSON. Open the SwaggerConfig.cs file in the App_Start directory and call the OAuth2 method within the SwaggerDocsConfig class. This method will return an instance of OAuth2SchemeBuilder which we’ll use to continue defining our authorization scheme. At minimum, you’ll want to provide the OAuth 2.0 flow, the authorization URL to obtain an access token and any resource scopes requires by your protected API endpoints. Below is how I defined the scheme in the sample project.
c.OAuth2("oauth2")
  .Description("OAuth2 Implicit Grant")
  .Flow("implicit")
  .AuthorizationUrl("https://localhost:44333/core/connect/authorize")
  .TokenUrl("https://localhost:44333/core/connect/token")
  .Scopes(scopes =>
  {
    scopes.Add("read", "Read access to protected resources");
    scopes.Add("write", "Write access to protected resources");
  });
Gotcha: Make sure to only use resource scopes and not identity scopes, such as “openid”, when using this in the Swagger UI.
After defining the scheme, view the generated Swagger JSON and scroll to the bottom of the file. You should see a securityDefinitions section with the OAuth 2.0 definition.
securityDefinitions: {
  oauth2: {
    type: "oauth2",
    description: "OAuth2 Implicit Grant",
    flow: "implicit",
    authorizationUrl: "https://localhost:44333/core/connect/authorize",
    tokenUrl: "https://localhost:44333/core/connect/token",
    scopes: {
      read: "Read access to protected resources",
      write: "Write access to protected resources"
    }
  }
}
At this point we’ve only defined the schemes. Next, we need to “tag” each protected operation in the Swagger with the appropriate security requirement property at the document or operation level to indicate which authorization schemes are required. This can be done by implemented a custom IDocumentFilter or IOperationFilter and adding these filters to the SwaggerDocConfig instance. An Operation filter allows you to post-modify Operation descriptions once they’ve been generated. A Document filter allows you to post-modify the entire Swagger document. I found it simpler to use an Operation filter for adding the security properties.
Create a class that implements IOperationFilter, I called mine AssignOAuth2SecurityRequirements, and place your logic in the Apply method.
public void Apply(Operation operation, SchemaRegistry schemaRegistry, ApiDescription apiDescription)
In ASP.NET, the easiest way to identity a protected swagger operation is to determine if the operation has the Authorize attribute. The Apply method passes in an instance of ApiDescription that will contain this information. If the operation contains this attribute, assign the appropriate security definition name to the operation’s security property.
public class AssignOAuth2SecurityRequirements : IOperationFilter
{
    public void Apply(Operation operation, SchemaRegistry schemaRegistry, ApiDescription apiDescription)
    {
        // Determine if the operation has the Authorize attribute
        var authorizeAttributes = apiDescription
            .ActionDescriptor.GetCustomAttributes<AuthorizeAttribute>();

        if (!authorizeAttributes.Any())
            return;

        // Initialize the operation.security property
        if (operation.security == null)
            operation.security = new List<IDictionary<string, IEnumerable<string>>>();

        // Add the appropriate security definition to the operation
        var oAuthRequirements = new Dictionary<string, IEnumerable<string>>
        {
            { "oauth2", Enumerable.Empty<string>() }
        };

        operation.security.Add(oAuthRequirements);
    }
}
Finally, add the Operation filter to the SwaggerDocsConfig instance.
c.OperationFilter<AssignOAuth2SecurityRequirements>();
Full Swashbuckle configuration at this point
GlobalConfiguration.Configuration
  .EnableSwagger(c =>
  {
    c.SingleApiVersion("v1", "SwaggerDemoApi");
    c.IncludeXmlComments(string.Format(@"{0}\bin\SwaggerDemoApi.XML",
                         System.AppDomain.CurrentDomain.BaseDirectory));
    c.DescribeAllEnumsAsStrings();
    c.OAuth2("oauth2")
      .Description("OAuth2 Implicit Grant")
      .Flow("implicit")
      .AuthorizationUrl("https://localhost:44333/core/connect/authorize")
      .TokenUrl("https://localhost:44333/core/connect/token")
      .Scopes(scopes =>
      {
        scopes.Add("read", "Read access to protected resources");
        scopes.Add("write", "Write access to protected resources");
      });

    c.OperationFilter<AssignOAuth2SecurityRequirements>();
  })
  .EnableSwaggerUi();
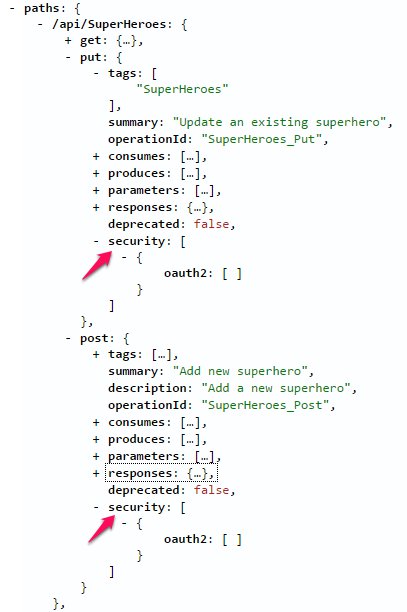
Examining the Swagger JSON we should now see our protected operations contain information within the security property. In my sample project, I decorated the POST and PUT superheroes APIs with the Authorize attribute.
We can take it one step further and add Roles as scopes to the security property.
public class AssignOAuth2SecurityRequirements : IOperationFilter
    {
        public void Apply(Operation operation, SchemaRegistry schemaRegistry, ApiDescription apiDescription)
        {
            // Determine if the operation has the Authorize attribute
            var authorizeAttributes = apiDescription
                .ActionDescriptor.GetCustomAttributes<AuthorizeAttribute>();

            if (!authorizeAttributes.Any())
                return;

            // Correspond each "Authorize" role to an oauth2 scope
            var scopes =
                authorizeAttributes
                .SelectMany(attr => attr.Roles.Split(','))
                .Distinct()
                .ToList();

            // Initialize the operation.security property if it hasn't already been
            if (operation.security == null)
                operation.security = new List<IDictionary<string, IEnumerable<string>>>();

            var oAuthRequirements = new Dictionary<string, IEnumerable<string>>
                {
                    { "oauth2", scopes }
                };

            operation.security.Add(oAuthRequirements);
        }
    }
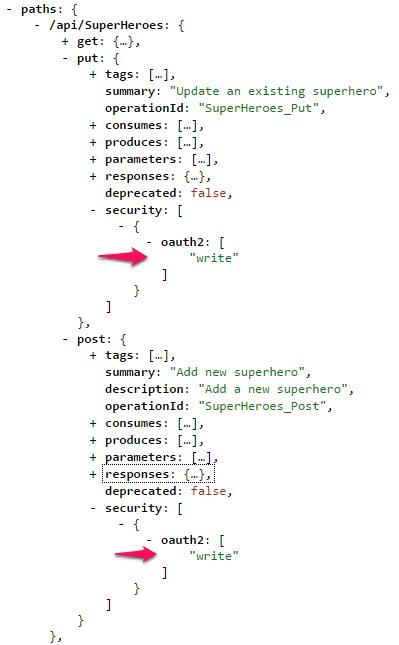
I added the “write” Role to the POST and PUT superheroes API
[Authorize(Roles = "write")]
and it reflects nicely in the Swagger.
Source code for this series: github.com/billpratt/SwaggerDemoApi
Related Posts